Friday, October 12, 2018

Low Country Boil


image


If you are planning on feeding a group of people who love shrimp, this may be the recipe for you.

   I had never made a Low Country Boil before this weekend and up until a couple of years ago had never heard of it. In Virginia, we had crab boils and seafood boils (Captains Catch). Living in Texas for a while, I was very familiar with a Crawfish Boil. so after some research, it all made sense.
   So, for those who may stumble upon this page and do not know a Low Country Boil is basically a shrimp boil and has many different names depending on where you reside. In Georgia, the popular name is a Low Country Boil.

   I read a ton of recipes and watched numerous videos on many different variations of preparing this feast. Some as simple as letting the ingredients stand on their own, were as others had a fortitude of spices and various additions such as apples, mushrooms, and oranges.  Almost all had shrimp, sausage, and corn. One guy basically made a salt stew and added his stuff in afterward. Not sure how he ate that, maybe lots of beer?!

   If you are making a small batch it is possible to make this in your kitchen, stovetop. If like me, you are making it for a crowd, you will need large pots and propane burners.

   As far as how much, this will vary depending on a lot of factors. How many are expected, what other foods will be on the table, how big of an appetite the guest will have. Men, woman, kids, or a mix of all will factor in how much will be consumed!

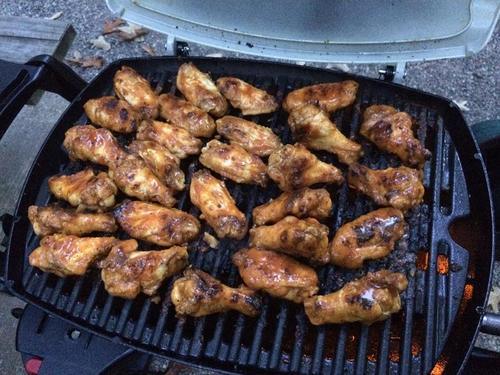
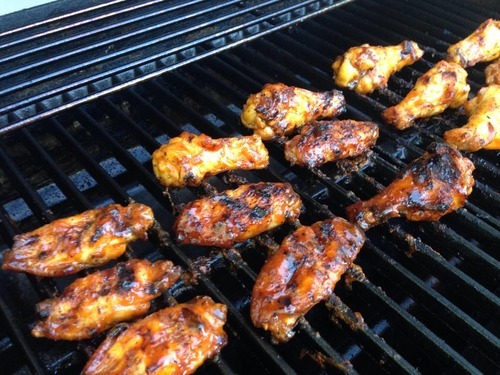
   I planned for 25-30. I did not factor in other foods although there were wings and a smoked butt as well as a couple side dishes. that being said, I had tons of leftovers. I would guess only half was eaten. So, could I have feed 50-60? Hmm, maybe. Better too much than not enough.

    Well, let’s get to it.  Again, this was my first ever attempt at a Low Country Boil as well as feeding a large group (25).

What you may need or rather what I used. You do you.

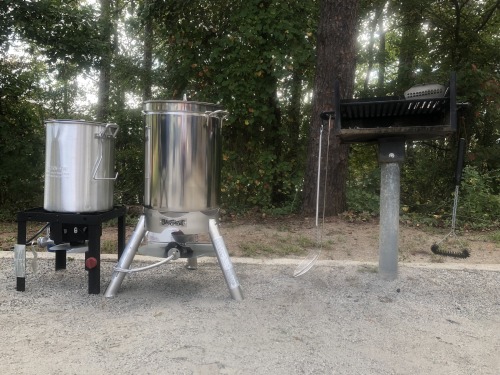
1 Turkey fryer kit (pot, strainer, and burner)

1 Bayou Classic 44 Quart Pot with strainer and burner

I used the Bayou Classic as my main pot and the smaller fryer as my overflow. I split each ingredient into both pots, 1 third to the small pot and 2 thirds in the large. I will continue as if using one pot.

Leather gloves, pot holders or oven mitts.

Propane.


image

Seasoning:

6oz container of Old Bay
4oz Zatarain’s Condensed Shrimp & Crab boil
3 Bags Zatarain’s Shrimp and Crab Boil
1 Elephant Garlic Head (peeled and cut into chunks)
2 onions (unpeeled, loose skin knocked off and cut in half)
10 Lemons-4halved, 6 Quartered (for garnish) Approximate: I just bought a bag of lemons.
½ cup cider vinegar

Food:
10 pounds of red potatoes( I bought two 5 lb bags)
8 Kielbasa Sausages (I used Carolina Pride)
14 pounds Shrimp (I used 2-pound bags of headless/shell on, deveined, jumbo, frozen shrimp from Walmart).
Corn- I used a 24 count and a 9 pack of the small frozen ears from Walmart. I would do a minimum of one per person.

Instructions:
   Fill the pot a little more than half with water and bring to a boil.
   Add… 3oz of Old Bay, Zatarain’s Condensed Shrimp & Crab boil, Zatarain’s Shrimp and Crab Boil bags, Elephant Garlic, onion halves, 4 Lemons halved, and cider vinegar.
   Mix well and let boil a minute or two.
   Then put 10 lbs Red Potatoes in your strainer, lower into the boiling water and boil 10-15 mins or close to done. I think ours took longer. You just have to keep checking them with a fork.
   Once you feel the potatoes are close add the cut Kielbasa sausage and the corn.
   Cook 10-15 minutes longer then mix in 14 pounds shrimp and turn off heat. Leave the lid on and the shrimp will cook without flame. Let it sit 15-20 mins.
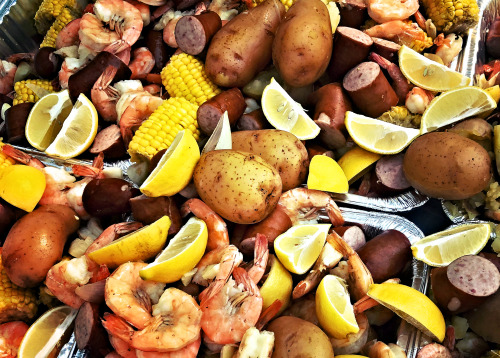
   Pull your strainer out and let it drip a minute and then pour it all into trays or right onto newspapers on your picnic table. Be careful if using plastic table cover as it may melt!
Hint: Two people work best. One to hold the strainer by the handle and one to lift the bottom to pour. We used the handle grabber that came with the fryer,  to lift the bottom. Just run it into one of the holes near the bottom of the strainer.

Take the rest of the lemons and spread over the top, take Instagram photo and post!

In addition to the stuff listed, I added a squeeze bottle of Land O Lakes Butter spread (for potatoes), the rest of the Old Bay and a bottle of cocktail sauce. I actually purchased 2 butter and 3 cocktail sauce but the extras were never needed.

   I would like to take a minute and thank the guys that helped me cook and serve the Boil to our kayak group! I could not imagine doing it without help! I would also like to thank those who pitched in to help supply the food!


What it cost:

   If you do not have to buy any cooking pots and such, you should be able to make this group classic for just under 200 dollars. (2018) Note: I did not factor in the cost of the onion, vinegar or boil concentrate since I already had it on hand. Mine came in at 165.00, not including tax.

Bon Appétit 🦐


Red Potato Salad

image
I call this Red Potato Salad because I use red potatoes and red onion with lots of Paprika on top. You can use whatever you like best. 
You will need…
10 Medium Red Potatoes Cubed
1 Red Onion Chopped
6 Boiled Eggs chopped
1 Cup Sweet Relish Cubes
2 Tablespoons Yellow Mustard
2 Cups of Mayo (We like BluePlate Olive Oil)
1 Tablespoon Salt
1 Tablespoon Garlic Powder
1 Teaspoon Cider Vinegar
Paprika, Olives and parsley or similar to garnish. (we like smoked Paprika)

Wash and cube (bite size) the potatoes leaving the skin on. 
Place the potatoes in a pan and cover with water and a pinch of salt and bring to a boil. Boil for 15 mins then drain.
Boil the eggs. Bring to a boil, boil 6 mins, Turn them off and let sit 3 mins. Transfer them to cold water and peel once cool enough to handle. Boil time may vary on stove and preference. 
Chop up the peeled egg.
Peel and chop your onion. Chop size is preference. I like mine fairly small.
Place all ingredients into a large mixing bowl and gently mix. You should have something resembling mashed potatoes with large potatoes chunks.
Transfer the potatoes salad to your serving bowl and sprinkle on paprika.
Make a small garnish in the center out of olives etc. I usually try to make it look like a flower of sorts.
For a spicy version, finely chop either fresh or pickled Jalapeño. If you use fresh, be sure and take out the seeds and pith as they will make it too hot! If you go with pickled you may want to experiment with leaving out the vinegar from the recipe.
Some of my family members make this with celery, I have not tried it but they say it is good.
Great summer dish for picnics. Goes great with a variety of foods. I like it with grilled chicken or burgers with baked beans.
Some good ole’ southern style ice tea goes well.

Adult French Toast


image
    This is another one of those dishes I throw together without a recipe. In order to share it here I had to come up with some measurements then adjust. I made this yesterday for breakfast … here is my first formula ….
Ingredients 
4 eggs
½ cup milk
1 oz di Amore’ Amaretto Liqueur***
½ oz Cointreau Liqueur***
½ tsp ground nutmeg
½ tsp ground cinnamon
½ tsp Dried orange peel (Get it in the spice section)
powdered sugar
4-8 slices of bread
EDIT: We have since started adding about 1/2 oz of Vanilla Vodka*** as well! For a full-blown adult recipe!! LOL
***You can substitute vanilla or almond extract for the Vodka, Amaretto and ¼ orange peel for the Cointreau for a non-alcohol recipe.
Preparation
    Add all of the ingredients except for the sugar in a glass baking dish or other suitable containers for dipping the bread. Wisk the mixture until it is well blended.
Cooking
Heat a frying pan or flat griddle to a medium to medium/high heat. You can use a tsp of butter or a cooking spray/oil to keep it from sticking. I prefer butter!
    Once the pan has heated and the butter melted, dip a piece of bread into your mixture and coat it good then flip and repeat. Try not to leave it in too long per side or it will become soggy. I have used slices from a french loaf that were a bit denser than sandwich bread. This would require a longer soak. You will get the feel for it after a few tries.
    Place the coated bread into the hot pan for about 2-3 minutes then flip. It should be golden brown. If it is not, adjust your flip times.
    Once the pieces are browned on both sides place them on a plate and sprinkle with the powdered sugar to taste. Add butter and syrup and enjoy!
    I have added a fruit mixture instead of the syrup. Basically, I took a frozen berry mixture some honey and a bit of sugar, placed it in the microwave long enough to thaw and heat it.
    Best served with orange juice and either bacon or sausage. I like Jimmy Dean’s Sage or link sausage. You may want Canadian bacon or maybe some shredded hash browns.

Pizza From Scratch

image
    We would rarely eat pizza since we rarely eat out. Not being a big fan of frozen pizza, we just never really gave it much thought. One night we decided to make our own. She does the dough and I prepare the toppings and assemble the pizza. This is what happened….

    After some experimenting and lots of trial and error we came up with a very good pizza and now we eat it almost traditionally every Thursday night!
At times we will do other flavors like pineapple and ham etc.
    Here is the one we make most.
Pizza crust
Basically you just use the directions on the pizza crust yeast then tweak it to your liking. This is enough for a medium pizza (8 slices)
1 cup unbleached flour (up to 2.5 cups flour)
¾ tsp salt
1 ½ tsp sugar
1 package pizza yeast
3 table oil
1 tsp garlic powder
2/3 cup water
In a mixing bowl add 1 cup [to start] flour, salt, sugar, and yeast then whisk to blend.
Heat 2/3 cup water for 30 seconds in the microwave- temp of water should be between 110-120 degrees to activate the yeast.
Then add water and oil to flour mixture
Using a plastic spatula mix until smooth
Mix in enough remaining flour to form a soft dough
Usually ½ to ¾ cup flour- requirement changes based on humidity, age of flour, elevation. You will have to experiment to see what works for you.
    Add ½ cup flour to a stand mixer and mix it with a dough hook for at least four minutes. Then add additional flour, in 2 tablespoon increments, until dough holds together in a ball but is still sticky about 8 minutes total. If you do not have a stand mixer you will have to mix the ingredients and kneed it by hand.
Once the dough is at the right consistency cover the bowl and let it rise for 30 minutes to 1 hour.
The dough will be airy and quite sticky- scrape the flour from the bowl onto a floured surface, roll or flatten and spread by hand into a 12-inch disk.
    We use a rolling pin and pizza mat from Pampered Chef and they work very well for this.
image
image
image
    Once you are comfortable with making the dough you can experiment with is some. We use flavored oils such as garlic and rosemary.
Oil the pizza pan and place the dough on the pan and stretch it gently as needed to reach the outside edge. We use a perforated non stick pan sprayed with PAM spray oil. We have rubbed on soft butter instead. You can use a regular pan or even a pizza stone. You may have to adjust cook times accordingly.
Toppings and Sauce
    We use to make our own sauce but found a canned sauce we like just as well. This saves a bunch of work and time.  We use Dei Frateli All Natural.
    That being said, you do not need much. We use about 3-4 oz spread evenly over the entire pizza excluding the edge (crust). Less is more in this case.
At this point you just go with what you like. You can sprinkle additional spice on the sauce or go straight to the toppings. How you top your pizza and the cuts you use for your vegetables will be up to you and your family’s preferences.
image
We try to cut everything a little early and lay it out on paper towels to remove some of the moisture. Here is what we use and in order of application:
Sauce
Garlic powder
Italian seasoning (comes in a grinder set at med grind)
2 and ½ Links of Johnsonville Mild or Sweet sausage links cooked/browned and drained
Baby Portobello mushrooms - Sliced 
Onion sliced in thin rings
Diced red bell pepper (sometimes yellow or green) (we have done thin rings)
    I do half for me and half for her so at this point I will add green and black olives to my side. At times we will use mild banana pepper rings and or jalapenos. On rare occasions anchovies. Be sure and mark the boundaries of the different toppings! I use the pan handles as a guide, you could use toothpicks. Also, be cautious of hot toppings as the juices may escape to areas of the pizza you do not want hot!
Shredded Mozzarella and fresh Parmesan cheese
Pepperoni slices – we use to put these on before the cheese but have found we like it better on top.
   This pizza was from the days of putting pepperoni on before the cheese… still looks good! (Before baking)
image
Here’s one with light cheese and it has extra toppings on half. (Before baking)
image
Cooking
    Once all of your toppings are on it, place it in the oven and set a timer for 20 minutes. You may do more or less based on the amount of toppings and you preference of brownness.
Oven 425 (test oven temp with thermometer)
Move rack up to top shelf
Bake 20 minutes

image
image
image
    Salad is the only side we have served with this, maybe you can come up with something better.. Unless you are a soda fan, beer and red wine go well with this.
    Some notes: We place the remaining sauce in a container and refrigerate. The same goes for the other half block of mozzarella, it gets a storage bag. We freeze the other half of the sausage in a quart freezer bag. It easily thaws for the next pizza when placed in hot water.
    Also if your toppings are right out of the fridge we like to get them to room temperature before baking the pizza. Cold into hot = condensation = wet soggy pizza.

Chili

image
    
    What’s better than some good spicy chili for that first cold snap! We don’t see much bitter cold here in Georgia, but cold enough for some chili. Looks like the weather is changing about mid week so lets get a batch going …
    I threw this recipe together years ago and pretty much stick to it. Sometimes I will add in Cayenne pepper to make it even hotter. You may try some corn, different varieties of beer, sausage or even beef chunks. That’s what I love about cooking. You can do what you want. If you end up not liking it, change it up.
Ingredients
2 lbs ground beef
2 tbs chili powder
1 tsp cumin
8oz mushrooms (we used baby portobello) stemmed and chopped
1 large bell pepper chopped
1 large red onion chopped
1 16oz can of light red kidney beans, drained
1 16oz can of dark red kidney beans, drained
2 16oz cans of diced tomatoes drained (we used garlic oregano flavored)
1 28oz can of tomato sauce
4 large jalapenos chopped - we seeded but if you want it very spicy, leave them in.
½ tsp cayenne pepper ( we omitted it from this batch, she likes it mild)
1 cup beer (you may start with a half cup just in case this is what caused our unexplained taste. If we figure this out I will edit the post)
Cooking
    First I brown the burger with a little salt and pepper to taste. At times I have added in some onion as well. Brown and drain off the grease. You can use the pot you plan on putting everything in or you can do it in a separate frying pan.
    You won’t want this down your drain as it will eventually harden and clog it up. We use a colander over one of the empty tomato cans with a paper towel under that to catch spills.
    Now we just add all of our ingredients along with the browned beef into a large pot. This go around we used a 6-8 quart enamel coated cast iron pot.
image
    Bring the mixture to a boil then cover and turn it down to a simmer. If the mixture is to thin for you, boil longer with the lid off to evaporate some of the liquid. Be careful not to burn it as it will stick to the bottom of the pot and taste pretty bad. That’s not much of an issue with this cast iron pot. You could also add more stuff to thicken the chili if it’s too thin for you.  If the chili is too thick add more tomato sauce, beer, or a little water. Whatever works for you. It’s really all about taste. You will know what to add to make it YOUR chili.
    I would let it simmer for at least 2-3 hours so the ingredients can really meld together. The longer the better! I have found that making it the day before really gives it time to mature the flavors. If your really hungry and do not want to wait, there is nothing wrong with eating some after the first half hour or so, it just wont be as good!
    I have even cooked this in a crockpot all day!

image


    There are lots of things you can do for condiments and sides for this. With this batch we just added a little shredded mild cedar cheese and some pickled jalapenos. We had baked bread with butter to dip with.           
    Fresh onion, sour cream, bacon pieces and cornbread work extremely well. Put them in little condiment cups to serve.
    Do I even have to say it? … Beer goes well with this! You may want to have some water on hand if you spice it up.

Pork Lo Mein

image
    Chinese is a favorite of ours and who doesn’t love using chopsticks! My better half (the real cook) loves developing recipes based on food I love. She perfected this one quickly and it has been a regular on the dinner table since. I’m a lucky man!
    Here is what she came up with …..
Ingredients 
8 ounces pork tenderloin sliced thinly (we cut 1 tenderloin into 3rds- freeze two, use one)
Semi-freeze the tenderloin to make it easier to slice thinly (Razor thin works best)
1 can water chestnuts drained and rinsed
1 can bamboo shoots drained and rinsed
10 to 15 snow peas trimmed and halved (leave whole if desired)
2-3 green onions tipped and cut  into two inch lengths. I then split the lengths longways. This isn’t as necessary with the green tops.
baby portobello mushrooms, stemmed, wiped with a damp paper towel to clean, and sliced.
image

Optional:
     In place of one of the above or as an addition: 1 large carrot sliced at an angle into narrow chips (no thicker than a bamboo shoot) or 1 cup shredded Chinese cabbage. You can pretty much use whatever vegetables you like as long as you keep the ratio to meat and noodles tolerable. Adjust quantities to your taste.
    You can also use chicken, beef, or shrimp, as well as a combination of several. The sky really is the limit with this recipe.
Sauce
4 tsp oyster sauce
2 TBS of soy sauce (I use 1 TBS regular soy and 1 TBS tamari soy)
2 tsp white sugar
2 tsp Chinese rice wine
 2 TBS vegetable oil
1-2 TBS sesame oil to taste
Pasta
    We like to use n. 13 Linguini for the pasta. Some like to use the thick spaghetti.  This is basically preference, use what you like.

    As a rule we use 2 oz. of pasta per serving and that is more than enough per person with the ingredients. If we plan on having it for lunch, we will add two more oz., for a total of six.  
    In a large pasta pot, bring salted (pinch) water to a boil. Once boiling, add pasta and let boil 15 minutes or until done. Refer to the box for the pasta you use for cooking times. Put the pasta in a strainer in the sink to drain. Let it drain well so that it will be slightly sticky. This helps the sauce stick to the noodles. Some people like to add oil to pasta water. I don’t recommend it for this since you want the sauce to coat and stick.
Bringing it all together 
In a wok, heat 1 TBS of the vegetable oil until lightly smoking, add the bamboo shoots and water chestnuts, (or carrots) stir-fry for at least 3 minutes on high heat to cook thru- they will still have some crispness.
Add the snow peas and fry two minutes more.
Add the mushroom and green onion, fry one to two minutes more- both lose crispness quickly so judge by look.
Remove vegetables to a bowl.
Heat remaining TBS of vegetable oil to lightly smoking.
Add the sliced tenderloin- use wooden spoons or chopsticks to separate the meat pieces and spread across the wok. Cook until no pink remains.
Push the meat pieces to the wall of the wok and pour the sauce into the center, it will come to an immediate boil. Let the boil continue for 30 seconds, then add the vegetables back in.
image
   Then add the pasta, pour about 1 TBS of sesame oil over the pasta, use large spoons or salad scoops to mix the pasta up with the sauce. Add more sesame oil if needed.
     We like to serve this with Pot stickers and a fortune cookie. I also like white pepper on my Lo Mein.
    Sake and Teas work well with this too.
image

享受

Bacon Wrapped Stuffed Jalapeños

image
I recently went camping with my Kayak fishing group and decided I wanted to try something different. I am a fan of grilled tuna stuffed Jalapenos but was not in the mood for the tuna. I thought I would give these a try …
Ingredients: (Approximate)
I box of plain cream cheese
12 medium fresh Jalapenos
2 tablespoons finely chopped oil packed sun dried tomatoes
Tablespoon of roasted garlic - I used Chef Cuisine pre-chopped ½ teaspoon is equivalent to one clove of garlic if you prefer fresh
1/8 cup fresh chopped basil
Dash of salt
12 strips of thin sliced bacon. I like apple wood cured or smoked
This is pretty simple to do and you can vary the quantities to taste. The amount of peppers needed to use all of the mixture will vary depending on size. You can probably easily do 24 with the one box of cream cheese! You will get a feel for it after a batch or two. Just use the remainder for a dip!
I mix all ingredients, minus the peppers, in a bowl.
    I then wash the peppers. If you decide to try these, I suggest using kitchen gloves or at the least keep your hands off of your skin,eyes etc, as well as off of family members until you have thoroughly washed your hands after handling the peppers!
    I cut the sides off of the peppers to make a sort of bowl and lay the extra piece (lid) aside. I try to keep the lids with their original pepper for a nice fit when assembling.
    I use a small spoon to scoop and scrape out the seeds. If you like it fiery hot leave some in! I don’t!

    Once the seeds are out, I pack each one with the cream cheese mixture. I am careful not to over fill. I use the spoon to pack it in to take up all space then scape the top to bring it level with the top of the pepper opening. Then I replace the lid (piece you sliced off).
    Once I have them all back together with mixture inside, I wrap each one with a slice of bacon. When I start my wrap I hold one end tight to the pepper, then start wrapping, pulling the bacon tight as I go. Loose bacon will just fall off when you grill. For an added measure I also used toothpicks to “tack” the bacon in place. On some larger peppers I actually added a second strip of bacon. You can never have too much bacon right!
    On my trial run of these I used water soaked bamboo skewers. I found that they were really not needed. If you ran some through the sides rather than lengthwise, like i did in the picture below, it may help keep the bacon on.
    The way I did it (trial run, see picture) did not help with the bacon and they would spin while turning. I found that just the toothpicks worked fine. I soaked those in water as well to keep them from burning up on the grill. If you serve these to guests, be sure and warn them of the toothpicks! You would not want perfectly good food devouring to turn to a trip to the emergency room or worse!!
image
    I grilled them on the Weber Q1200, on a med to med high heat, until the bacon was done, turning often to prevent the peppers from scorching.
    Between the bacon grease and the melted cream cheese falling out of the peppers, they will make quite the mess! I like direct heat with no barrier so I just dealt with it and cleaned up after. If you try these you may opt for some foil.
image
Serve as an appetizer. Awesome camp or tailgate food. Have plenty of napkins on hand.

Beer, margaritas and water or tea may compliment this yummy treat.

Frozen Coffee Treat

image
Most times when I post it will be, I do this, I do that. Sometimes I will be a bit more specific. This is one of those times……
I had typed this one up on facebook for family members to use so it was an easy post! Copy/Paste is my friend! After reading over it, it seems I was in a wacky mood that day LOL
Oh Crapachino
What you will need…
A blender
A large spoon or a long tongue
A straw (preferably the bendy flexy kind in some awesome color)
I Solo Cup Any Color or a Glass if ya fancy
Enough ice to fill said cup/glass
2-3 scoops good vanilla ice cream
2 tablespoons of Sugar In The Raw (Natural Cane Turbinado Sugar)
4 oz Quality coffee made very strong
1 oz Liquid caramel flavoring
Squeeze bottles of chocolate and caramel syrup
Can of whip cream and none of that fat free crap
1 maraschino cherry (stem optional)(cherry optional)
Set up your blender and add the cup of ice and the ice cream
Make the strong coffee and add the sugar and liquid caramel flavoring to the hot coffee and stir until sugar dissolves. Pour this mixture in the blender with the ice and ice cream and secure the lid. I pour all but a small amount because the sugar never really dissolves and I can swirl that around to gather up the sugar to pour in the blender.
Let that sit while you set up your Cup and gather the toppings.
Pulse blend mix chop the stuff in the blender until the ice is very fine. You will have to stop a few times and shake the ingredients down to the blades to insure you get all the ice chunks to the desired consistency.
Once you get it just right dump it in the cup/glass. Here is where you will need the spoon or your tongue to get the last bit out of the bottom of the blender. Take care not to cut your tongue on the blades .. they are sharp! If it won’t all fit in your cup just pour the rest in your mouth or you could share with a friend, or just dump it in your mouth.
Once you have your cup/glass almost full (leave room for toppings) squirt a tall helping of the canned whip cream of the fattening variety on top and drizzle sha zizzle the caramel and chocolate all over it. (preferably in some neat cross hatch pattern … if ya fancy)
Slap the cherry up on top and insert straw ….. enjoy!
Add Kahlúa for a delicious adult beverage .. MMmmm
WARNING: Drinking this too fast may freeze ya brain and or chest. Giving this to small children may keep you up all night. Seconds highly recommended, especially if your not the one making them! And if I left something out or you screw it up it aint gonna taste right, try again.

Crab Legs

image
    Snow, Alaskan, King, whatever your preference ….. Big tasty crab legs …  We love them!
    We watch for sales and stock up when the price is right! We like the pre-cracked legs for easier (faster) consumption!
    Here is the simple way we do them ….
    So we usually get Private Selection when we can. I think this is a Kroger only brand.They are very good and slightly sweet rather than a fishy, salty taste. Yummy! Keep frozen until ready to go in the pot.
image
    We use a multi-pot with the deep strainer/colander in place for easy removal. We boil the legs so the strainer/colander is not really needed.  You can just put the legs in a pot of boiling water and use tongs or dump the crabs out into another strainer in a sink.
    So I fill the pot up with enough water to cover the legs, but do not put the legs in just yet. Then I get a head of garlic and bust open the cloves. I just lay a clove on the cutting board and place a large wide knife over it and smash it with my hand. This opens it right up as well as break it up a bit. I don’t try to be neat or remove the peels. The main thing is to expose the garlic. Just be careful if you are using a sharp knife not to cut yourself. Try tilting the cutting edge slightly downward so if your hand lands on this area it will slide down and off of the knife. If you are uncomfortable use something else. Heck use a meat tenderizing hammer if you like! Once I have a good amount, I usually use about a half head for 2 pounds of crab legs. I throw that in the pot of water and bring it to a boil. We put in a bit of extra water and let it boil a while to really get the garlic flavor in the water. If I want a bit of spice I toss in a tablespoon or two or Old Bay.
    The pre-cracked legs are good to go, but if the legs are not  pre-cracked you will want to poke a small hole or two in each section of leg to allow the garlic and spice to get into the leg. I have found that corn on the cob holders work great for this.
    Once I am satisfied with the boil I put the frozen legs in and cover the pot with a lid and boil 7 minutes.
image
Drained and ready to serve!
I remove and place the strainer in a sink and let them drain a bit, then serve and enjoy!
image
    Good served with hush puppies, corn on the cob, and coleslaw. If you are really hungry, boil up some baby red potatoes or serve up some french fries.
    I make sure to provide a large bowl or two for my guest to have a place to put the empty shells!
    We also like vinegar (malt or cider) and clarified butter for dipping. For an even spicier leg, put a bunch of Old Bay in a paper bag and place in the legs and shake to give them a good coating.
    For a beverage, beer and white wine work well. Lemonade or peach tea are good for a non alcohol choice.
    Here is an awesome guide to some crab info I found online … LINK

Let's Talk Wings


image

Grill in this photo is a Weber Q1200
    I love wings! I mean who doesn’t, right? When I first started grilling wings years ago I had a meticulous and time-consuming method that required cooking and thickening the sauce. Over time, I  have found I can make wings without the hassle and still achieve an awesome tasting wing.
Here’s how I do it now ………
    Prep -
    I purchase the whole wings and cut them myself. A chicken wing is made up of three parts, The wingtip, lower wing (flat with two bones) and upper wing (mini drumstick) I throw out the tip and divide the remaining wing into two pieces.
    Once this is done I rinse the meat and pat dry and place in a container. I coat the wings in olive oil and heavily season with whatever spice I’m in the mood for or have on hand. Most times it's #Weber’s Beer Can Chicken seasoning, salt, pepper, and garlic. I season heavily because most of the seasoning ends up dripping off with the oil while sitting as well as while cooking. I just throw in the seasoning with the oiled parts and mix it up well then set aside.
The Sauce -
    Although I do reference cookbooks at times, I mostly cook off the cuff. I tend to throw stuff together based on what I think works well together. Most times you won't see a measuring cup either. This is one of those times. After cooking something so many times you eventually develop a feel for how much of what you need.
    I start with a medium mixing bowl (preferably metal) and dump in about half a bottle of #TexasPete Wing Sauce (regular, Texas Pete also makes a milder and a very hot version of the sauce), about a half cup of honey, half stick melted butter, 2-3 tablespoons yellow mustard and a couple tablespoons of preferred seasoning - again whatever I have on hand. Usually, I go for a good amount of garlic powder (unsalted), a bit of salt and pepper, and a Chipotle or Cajun type seasoning. I have been using Weber's New Orleans Cajun and some Cholula Chipotle Hot Sauce.  I try not to add in things like cayenne pepper or jalapenos as the Texas Pete is generally hot enough for me. Be creative and do what works for you. In all, I would say about 2 - 3 tablespoons of total seasoning. Taste and adjust. If it seems to have too much seasoning, add more Pete to dilute it.
Grilling - 
    Originally, I stuck to a strict cooking method of, coating the wings in sauce (no pre-oil mixture), placing on the preheated grill with high heat 12 minutes, turning every 3. Now the method just requires preheating the grill, regulate to med-high, then place the oil-coated wings on. The sauce will be added later. This allows the wings to crisp up and turn a golden brown. I turn as needed for about 12-15 minutes. Once I feel they are done or close to it, I turn the heat down to a medium or medium-low, depending on how the temperature is running on the grill I am using (I have 3 to date), then I remove a batch from the grill and toss in the sauce. I coat them well and return to the grill. Then I let the heat thicken the sauce on the wings and repeat at least once more, sometimes a third coating. If I am cooking other things in the house I just turn down the heat and turn them now and then to make sure nothing is burning. If you insist on juicy wings you may want to adhere to a strict cooking time frame. The sauce is my juice!
Another load on the Q!

image

These wings are so good - Once you have one, your tongue will reach out and smack ya in the face until you give it another!
Sides -
We usually make coleslaw, hand-cut french fries, and lengths of carrot and celery with ranch and blue cheese dressings for dipping. You will want a large dipping cup so you can slap that wing in there too! Potato salad and baked beans also work with this.
I will blog about the sides at some point I’m sure.
Beverage -
    Ice Tea, Beer, and Margaritas go well. I have occasionally even had white wine. Your taste may vary.

image

Here are some wings on the big Weber Silver.

FIN